Monday, 23 November 2015

Criteria D

Under Self Evaluation Post

Reflection on Criteria A

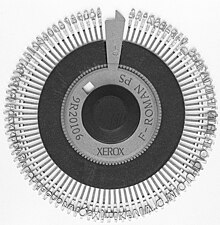
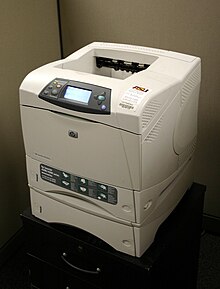
 Reflection on the research of printers

 What I did? (What did you do to finish your project)
I described and make a blog post on all the printers we were supposed to research, I put lots of detail in the description and put interesting pictures.
 What I enjoyed? (Write about what you liked most in the project)
I liked the research because I learnt new things that I wouldn't normally know about.
 What I found difficult?( Write about any part of the project that you found hard to do?)
I did not find anything difficult in the project.
 What really worked?(Write about any part that you thought worked well)
The facts, when was it invented, who invented it,,,
 Next Time (Write about what you would do differently next time)
I could have compared and contrasted Non-Impact and Impact printers in a better way

Reflection on TinkerCAD tutorials

 What I did? (What did you do to finish your project) 
I did the lesson scale,copy and paste to show people how to finish the lesson.
 What I enjoyed? (Write about what you liked most in the project) 
Showing people the lesson and the tutorials.
 What I found difficult?( Write about any part of the project that you found hard to do?)
I didn't find anything difficult. 
 What really worked?(Write about any part that you thought worked well) 
The screenshots and the description worked very well together.
 Next Time (Write about what you would do differently next time)
I could add another lesson for more detail and more tutorials.

Reflection on TinkerCAD objects 

 What I did? (What did you do to finish your project) 
I made a gaming controller because I love gaming.
 What I enjoyed? (Write about what you liked most in the project) 
Modelling and making the controller.
 What I found difficult?( Write about any part of the project that you found hard to do?) 
Making the model exactly as I wanted to, it was hard to make the model exact.
 What really worked?(Write about any part that you thought worked well) 
Making the flowchart to show the steps and tutorial.
 Next Time (Write about what you would do differently next time)
Try another object and make the model a bit detailed.


Sahil's controller is a good representation of both his sketch and his design specification. This is because he has taken inspiration from preexisting controllers like the Nintendo GameCube for button layout and the dual shock 4 for the build layout. there are many colors in the controller, making it very appalling to practically anyone under the age of 20. these colors are some that boys like more so this matches the design specification. the design has curved edges and in a medium sized controller like he mentioned. the only thing missing that i could find from the design was the lack of rubber to stop slipping from hands. overall, the controller is well made and the addition of the battery displayed is a smart idea.

Peer evaluation by Rishabh.

Criteria C

TinkerCAD Project


This is my final TinkerCAD Project, I have redesigned a gaming controller to make to better for a gamer's needs.

Step 1: I took a round roof and put it in a 22.5 to 40 degree rotation and adjusted it to a realistic size.
Step 2: I took a half sphere and put it under the round roof.
Step 3: I put 4 spheres in their appropriate position.
Step 4: I put the analogs,buttons and grips on the spheres.
Step 5: I took a round roof to connect the spheres and both parts of the controller.
Step 6: I took a round roof and copied the 1st step.
Step 7: I took a half sphere and copied step 2.
   

FLOWCHART 


Criteria B


Criteria B


Old Design
  
                     
New Design
New features- Grips on the place where you hold the controller so it feels comfortable while playing the game. I added another analog and removed the button for more control while playing a game.'

Justification of design 
I chose the new design because it has grips and is more advanced than the previous design, it has a lot of new features that will help the gamers while playing FPS games and other types of games.


 Developing a design specification
Aesthetics
It is made out of plastic, multiple colors, a smooth texture.
Cost
The controller will be 35$.
The controller takes a long time to make.
Customer
It is for kids and teenagers, from 7-18.
Environmental
Considerations
N/A
Function
It is used to control whatever you are playing.
It works on consoles.
It can be charged and stored anywhere safe.
If you don’t  throw it purposely on the floor it
will work properly.
Manufacturing
It takes a lot of time to design.
The resources we would need are plastic and rubber.
Materials
The plastic will need to be smooth.
Where you hold the controller, there will be rubber
rings so the controller doesn’t fall while playing.
Safety
It will be curved so you don’t get scratches and cuts.
Size
It will be a medium size, just like other controllers.
It will be medium sized so people who are young
can play the game easily.

Criteria A

      3D Design Modelling-Inquiry and Analyzing

The Father of Printing

Johannes Gutenburg invented the printing press in the 1450's, and the first book to ever be printed was a Latin language Bible, printed in Mainz, Germany. Johannes Gutenburg invented the printing press in 1439.
 In 1448, Johannes Gutenberg moved back to Mainz and by 1450 was operating a print shop. He had borrowed 800 guilders from local financier Johann Fust to purchase specific tools and equipment needed for his unique typography method.
Records of Johannes Gutenberg’s later years are as sketchy as his early life. Still living in Mainz, it is believed that he went blind in the last months of his life. He died on February 3, 1468, and was buried in the church of the Franciscan convent in the nearby town of Eltville, Germany.


References: http://www.greatsite.com/timeline-english-bible-history/gutenberg.html 
http://study.com/academy/lesson/johannes-gutenberg-inventions-facts-accomplishments.html
http://www.biography.com/people/johannes-gutenberg-9323828#related-video-gallery

Impact and Non-Impact Printers

Impact Printer
An impact printer makes contact with the paper. It usually forms the print image by pressing an inked ribbon against the paper using a hammer or pins. Following are some examples of impact printers.
Example: Dot-Matrix Printer and Daisy Wheel Printer

Non-Impact Printer
Non-impact printers do not use a striking device to produce characters on the paper; and because these printers do not hammer against the paper they are much quieter. Following are some non-impacted printers.
Example: Ink-jet Printer and Laser Printer

          IMPACT PRINTERS
       NON-IMPACT PRINTERS
COST: CHEAP
EXPENSIVE
NOISY
QUIET
QUALITY IS NOT VERY GOOD
GOOD QUALITY OF PRINTING
 LONG LASTING
LONG LASTING


http://www.byte-notes.com/types-printers#simple-table-of-contents-1

Evolution of Printers

Dot-Matrix Printer

Dot Matrix Printing is a type of computer printing which uses a print head that moves back-and-forth, or in an up-and-down motion, on the page and prints by impact, striking an ink-soaked cloth ribbon against the paper.
When was it Invented:1970
Who invented it: Robert Howard
Technology: Dot-based Printer
Advantages: low purchase cost, can handle multi-part forms, cheap to operate, only needs fresh ribbons, rugged,low repair cost and the ability to print on continuous paper.
Disadvantages: noisy, low resolution (you can see the dots making up each character), not all can do color, color looks faded and streaky, slowness.
References: https://en.wikipedia.org/wiki/Dot_matrix_printing

Daisy Wheel Printer

The daisy wheel is a disk made of plastic or metal on which characters stand out in relief along the outer edge. To print a character, the printer rotates the disk until the desired letter is facing the paper. Then a hammer strikes the disk, forcing the character to hit an ink ribbon, leaving an impression of the character on the paper. 
When was it invented: 1969
Who invented it: David S. Lee
Technology: Dot-based Printer
Disadvantages: They're VERY noisy, slow and you must change the ribbon.
Advantages:  The final print copy looks like it's been typed on a high quality typewriter.
References: https://en.wikipedia.org/wiki/Daisy_wheel_printing

Ink-jet Printer 

A type of printer that works by spraying ionized ink at a sheet of paper. Magnetized plates in the ink's path direct the ink onto the paper in the desired shapes.
When was it invented: 1951
Who invented it: Helwett-Packard(HP)
Technology: Ink jet
Disadvantages: error messages due to the ink, the durability was poor and it used to clog a lot.
Advantages: Quiet, prints finer and smoother pages, 

References: https://en.wikipedia.org/wiki/Inkjet_printing

Laser Printer

A type of printer that utilizes a laser beam to produce an image on a drum. The light of the laser alters the electrical charge on the drum wherever it hits.
When was it invented: 1969
Who invented it: Gary Starkweather
Technology: Laser
Advantages: Fast and efficient, good printing quality and quiet
Disadvantages: Costly, Takes up space
References: https://en.wikipedia.org/wiki/Laser_printing

Thermal Printer

A printer in which fine heated pins form characters on heat-sensitive paper.
When was it invented: 1972
Who invented it: Jack S. Kilby
Technology: Heat and Thermal
Advantages: Easy and fast, Flexibility and takes up less space.
Disadvantages: Expensive , Curled paper 

References: http://www.buyrolls.com/blog/2011/11/the-advantages-of-using-thermal-paper-and-printers/

3D PRINTING

What is 3D Printing? 
Printing a physical 3D model.

How does 3D Printing work?
3D scanners use different technologies to generate a 3D model such as time-of-flight, structured / modulated light and many more.

Technology: 3D Models and scanning the picture to make it 3D.
Where would you find 3D printing?
In Dubai, I saw 3D printing in Virgin Mega store.
Who would use 3D printing? People who make animated episodes or 3D modelers.

References: http://3dprinting.com/what-is-3d-printing/

TinkerCAD Lessons

Lesson: Scale, Copy and Paste

1. I put a cylinder in the workplane and dropped it in the are outlined in orange.


2. I repeated the process and put another cylinder in the area outlined in orange.


3. I scaled the cylinder from the height of 20 mm to 15 mm. 


4. I dragged another cylinder in the orange outlined area.


5. I scaled the last cylinder from a height of 20 mm to 10 mm.


Now I learned how to scale, copy and paste on TinkerCAD.

My boat on TinkerCAD.


DESIGN SITUATION

I am a student in Emirates International School. As part of MYP design in Term 1, we are using the web app called TinkerCAD which helps design 3D objects. Computer Aided Design has evolved as a unique way of creating 2D and 3D objects. It is used to create precision drawings or technical illustrations.
As part of the MYP Project I have decided to design an gaming console controller in 3D which can help designers rectify issues with previous designs.
I am a gamer myself, I think it will be better for us gamer's to feel more comfortable while playing video games.
Yes, there are various designs, but none of them have grips, they mostly have analogs and buttons close to each other.
It will have grips, to enhance the gaming experience and the controller's will be spaced out and bigger.
"I am redesigning a gaming controller for the gamer's around the world. While you play games, it has to be very comfortable and sturdy so it will be very convenient.